Description
In order to externally create or update patients in Webdoc, there are some required data that needs to be pre-collected before these requests can be fulfilled.
This tutorial describes the different CRU flows of patients via different REST API endpoints in the context of Webdoc. Moreover, the authorization necessary through these flows is based on the "OAuth 2.0" protocol.
All in all, the REST API endpoints included in this tutorial are the following:
-
GET /v1/patientTypes
(To get available patient types from Webdoc in which you want to relate patients to.) -
POST /v1/patients
(To create a new patient based on a Swedish personal number.) -
PATCH /v1/patients/{personalNumber}
(To update an existing patient based on the patient's personal number.) -
GET /v2/patients
(To get available patients from Webdoc.)
Prerequisites
- API credentials must be configured in the WD auth server, such as a client ID along with a client secret and scopes, etcetera. These credentials will be setup and provided to you by Carasent.
- The grant_type "client_credentials" must be used in order to request a valid access token for this context.
- To fulfill the necessary API flow for this entire tutorial context using the same access token, the token must be based on the scopes: "patient:write" (which covers "patient:read"), and "patient-types:read".
- At least one patient type must be created in Webdoc. Patient types can be managed via the Webdoc GUI through the menu path: "Administratör > Inställningar > Patienttyper".
Workflow 1 - Steps to receive an access token to externally manage patients
-
To be able to issue an access token that can be used through all API calls in context of this tutorial, you can request an access token based on the following API credentials:
- Grant type: client_credentials
- Scopes: patient:write, patient-types:read
Furthermore, you need a client ID and client secret, which will be provided to you by Carasent. Below is an example of how this access token can be requested through CURL having <client_id> and <client_secret> replaced with your client ID name and client secret.
Example CURL - Request an access token for this context for your TEST environment:
    curl -X \
    POST -u "<client_id>:<client_secret>" \
    -d "grant_type=client_credentials&scope=patient:write%20patient-types:read" \
    https://auth-integration.carasent.net/oauth/token
The requested access token will then be returned in the following JSON format.
Example JSON response - Access token with multiple scopes:
    {
        "access_token": "dbc5051a41f22a70e43432c0db329cc80fbed103",
        "expires_in": 3600,
        "token_type": "Bearer",
        "scope": "patient:write patient-types:read"
    }
Note! An issued access token is valid for one hour.
Workflow 2 - Steps to externally create a patient
-
Once you have received a valid access token (via workflow 1), you can get the available patient types from Webdoc to then select one to be related to the patient you want to create.
Example CURL request - Get patient types from your WD TEST environment with attached token:
    curl https://api-integration.carasent.net/v1/patientTypes \
    -H "Accept: application/json" \
    -H "Authorization: Bearer dbc5051a41f22a70e43432c0db329cc80fbed103"
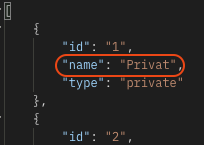
As you can see in the below example response, the name of the patient type is circled as it is the name that will be attached in the later request to create a patient.
-
When wanted patient type has been fetched, you can then create a patient by posting the name of the patient type along with the other required parameters to the endpoint "POST Patient".
An example of a CURL request to create a Swedish patient in Webdoc can look like below.Note! When creating a patient in your PROD environment, a request will also be done to the Swedish SPAR (Statens personadressregister) based on the posted personal number. This will automatically fetch the patient's address details to also be saved for the patient. However, worth mentioning is that there will never be real personal data fetched for you test environment.Example CURL - Request to externally create a patient in Webdoc:
    curl --location --request POST 'https://api-integration.carasent.net/v1/patients' \
    --header 'Authorization: Bearer dbc5051a41f22a70e43432c0db329cc80fbed103' \
    --header 'Content-Type: application/json' \
    --data \
    '{
        "personalNumber": "19121212-1212",
        "listInfo": {
            "name": "Test clinic",
            "hsaId": "SE-123456789",
            "countyName": "Stockholms län"
        },
        "patientType": "Privat",
        "email": "test.mail@example.com",
        "mobileNumber": "+46701740605"
    }'
Note! If you want to create a patient without a social security number, such as a foreign patient, you can use the following API endpoint: POST Patient Without Social Security Number
Workflow 3 - Steps to externally edit a patient
-
Once you have received a valid access token (via workflow 1), and given that at least one patient exists in Webdoc, you can then select to externally edit a patient.
Moreover, to get an overview of existing patient details to be updated, you can fetch available patients from Webdoc via the endpoint "GET Patients". To limit the response to a specific patient, you can for instance attach the personal number in the header as in the example request below.
Note! The API endpoint "GET v1/patients" is deprecated and will eventually be phased out, so please make sure to use v2 as in the endpoint link above and example below.Example CURL request - Get specific patient details from your WD TEST environment:
    curl https://api-integration.carasent.net/v2/patients \
    -H "Accept: application/json" \
    -H "Authorization: Bearer dbc5051a41f22a70e43432c0db329cc80fbed103" \
    -H "personalNumber: 19121212-1212"
Once you have attached a valid access token along with the patient's personal number, you can then expect to get the patient details returned in JSON format. You can see example of the expected JSON response for a specific patient via the "GET Patients" endpoint documentation under "Example response" by changing the option "JSON Schema" to "Patients by PersonalNumber".
-
Furthermore, when you want to update the details for an existing patient in Webdoc, you can
do so via the endpoint
"PATCH Patient". A CURL request to update a patient
can look like below.
Example CURL - Request to externally update a patient in Webdoc:
    curl --location --request PATCH 'https://api-integration.carasent.net/v1/patients/19121212-1212' \
    --header 'Authorization: Bearer dbc5051a41f22a70e43432c0db329cc80fbed103' \
    --header 'Content-Type: application/json' \
    --data \
    '{
        "listInfo":{
            "name": "Test clinic 2",
            "hsaId": "SET5565594230-119n",
            "countyName": "Västra Götalands län"
        },
        "patientType": "VGR",
        "email": "updated.mail@example.com",
        "mobileNumber": "+46701234567",
        "firstName": "John",
        "lastName": "Doe",
        "spokenName": "John",
        "address": "Street address 1",
        "coAddress": "The neighbours",
        "city": "Gothenburg",
        "zipCode": "12345",
        "stateCode": "14",
        "countyCode": "80"
    }'
A successful update request will then return an empty JSON response with status code "200".
Context flow 1 - Externally create a patient
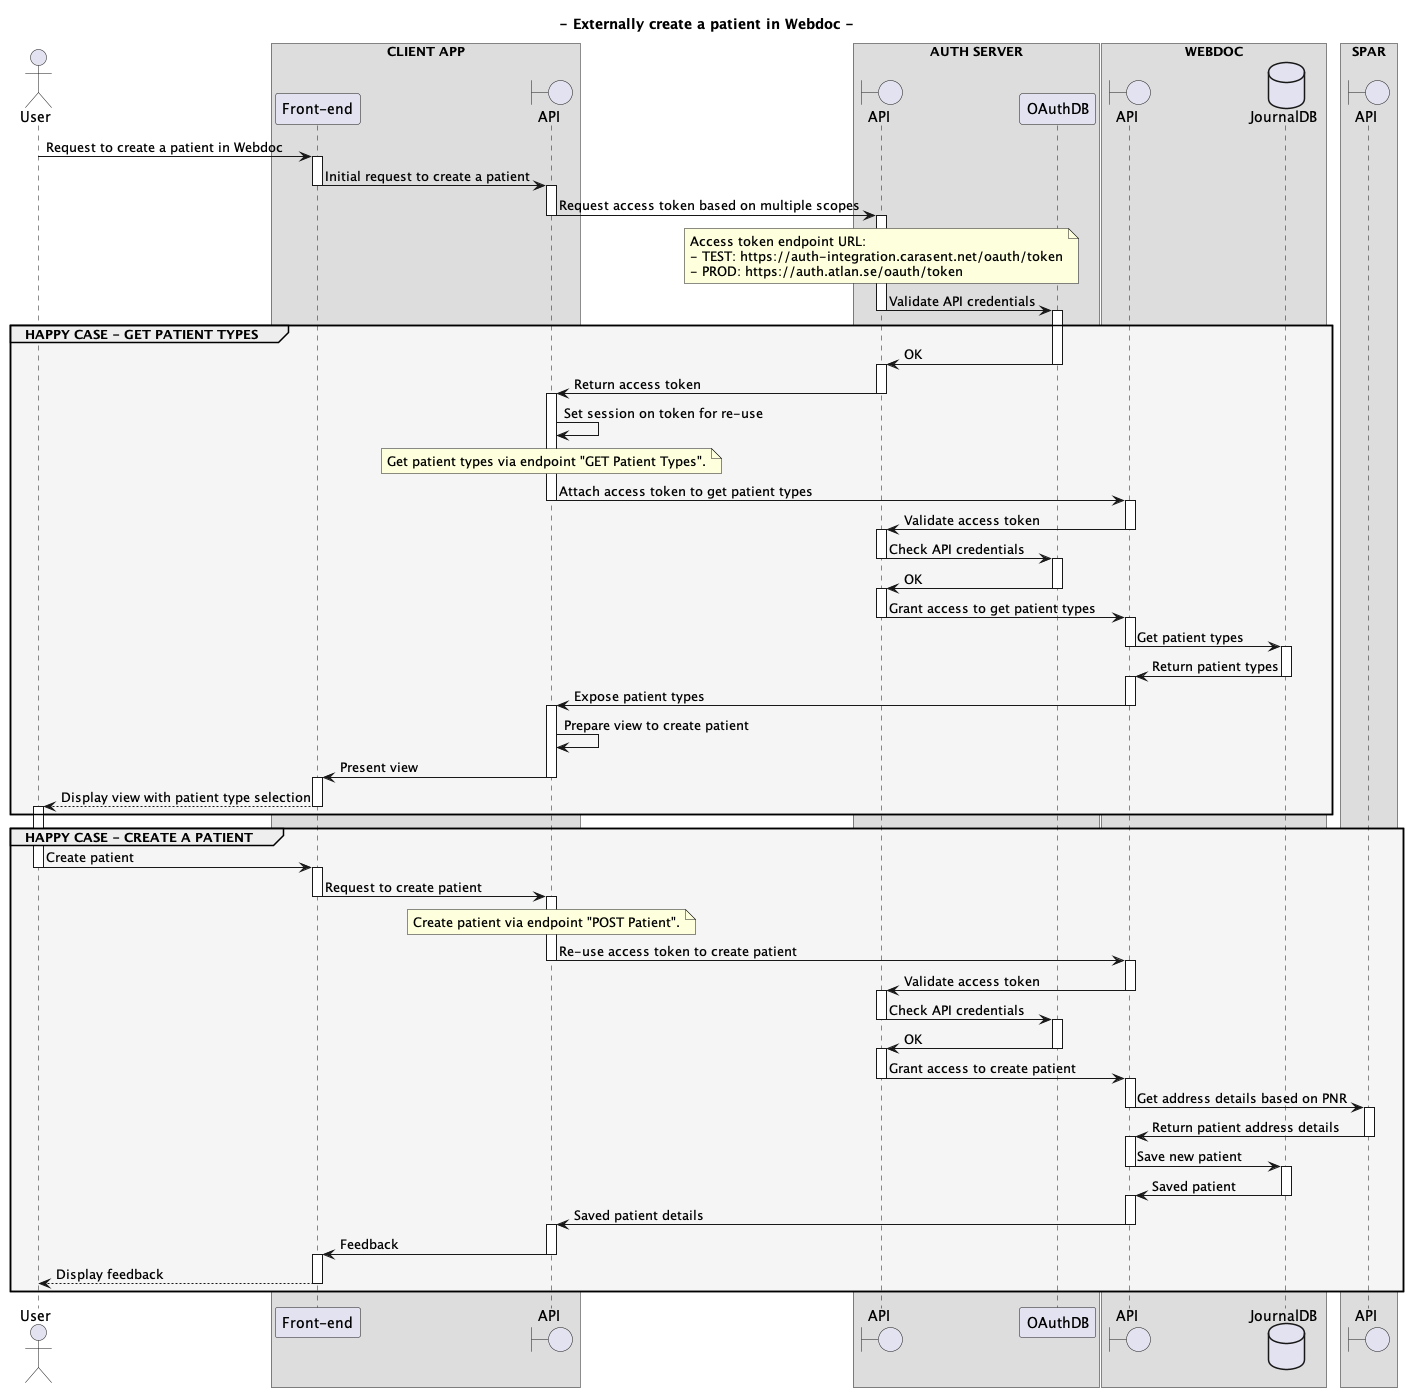
The below sequence diagram illustrates the necessary sequence flow to request an access token used to get patient types to in turn create a patient via a WD REST API (click on the image to see it in original size):
Context flow 2 - Externally edit a patient
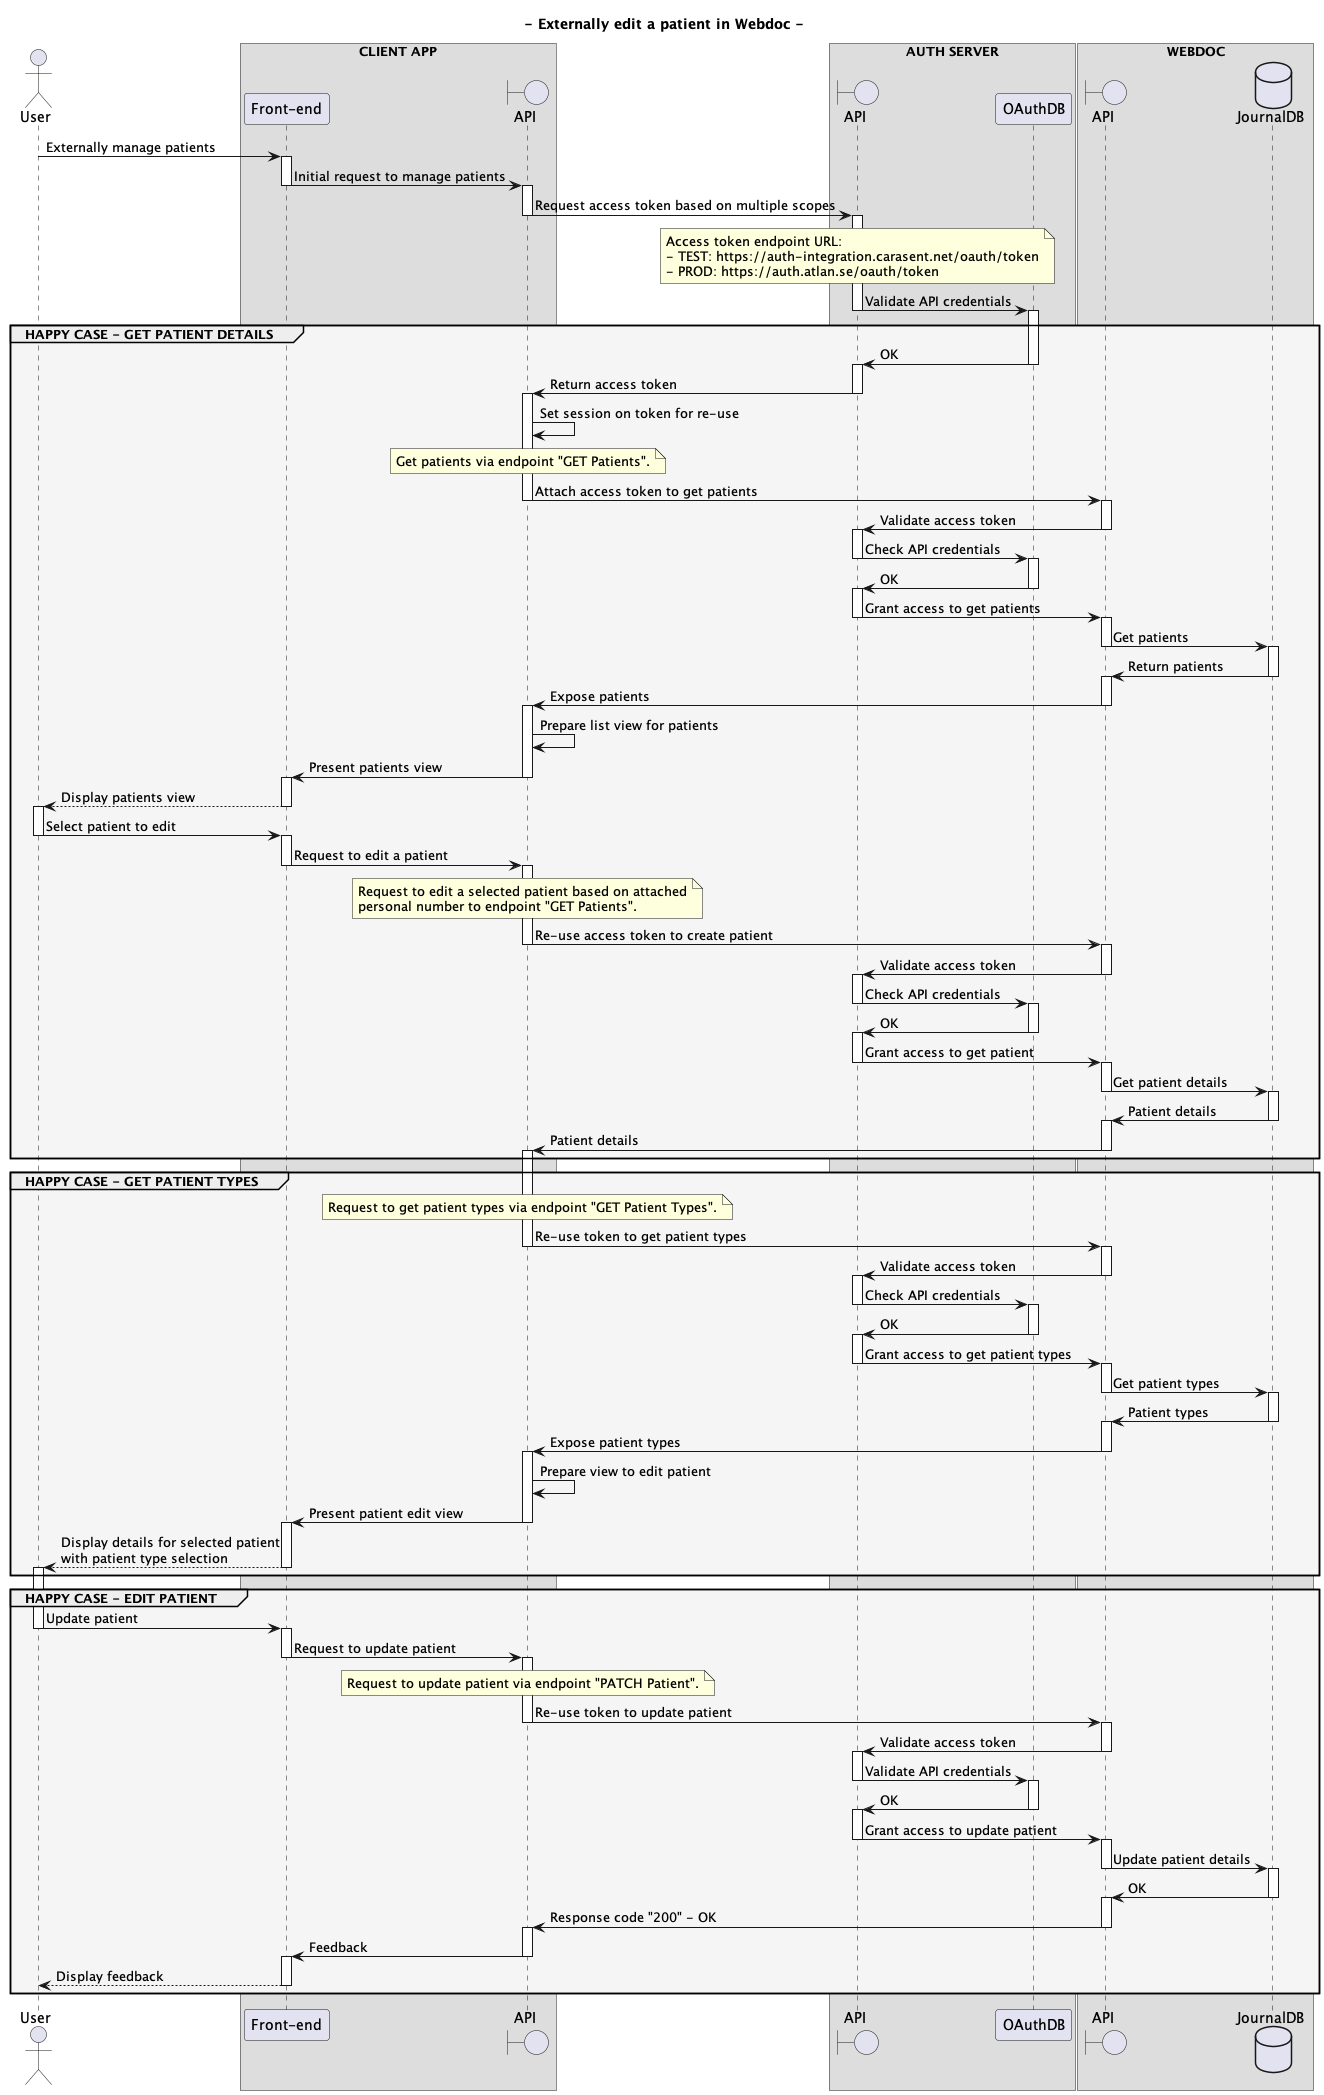
The below sequence diagram illustrates the necessary sequence flow to request an access token used to get necessary data to in turn update a patient via a WD REST API (click on the image to see it in original size):