Description
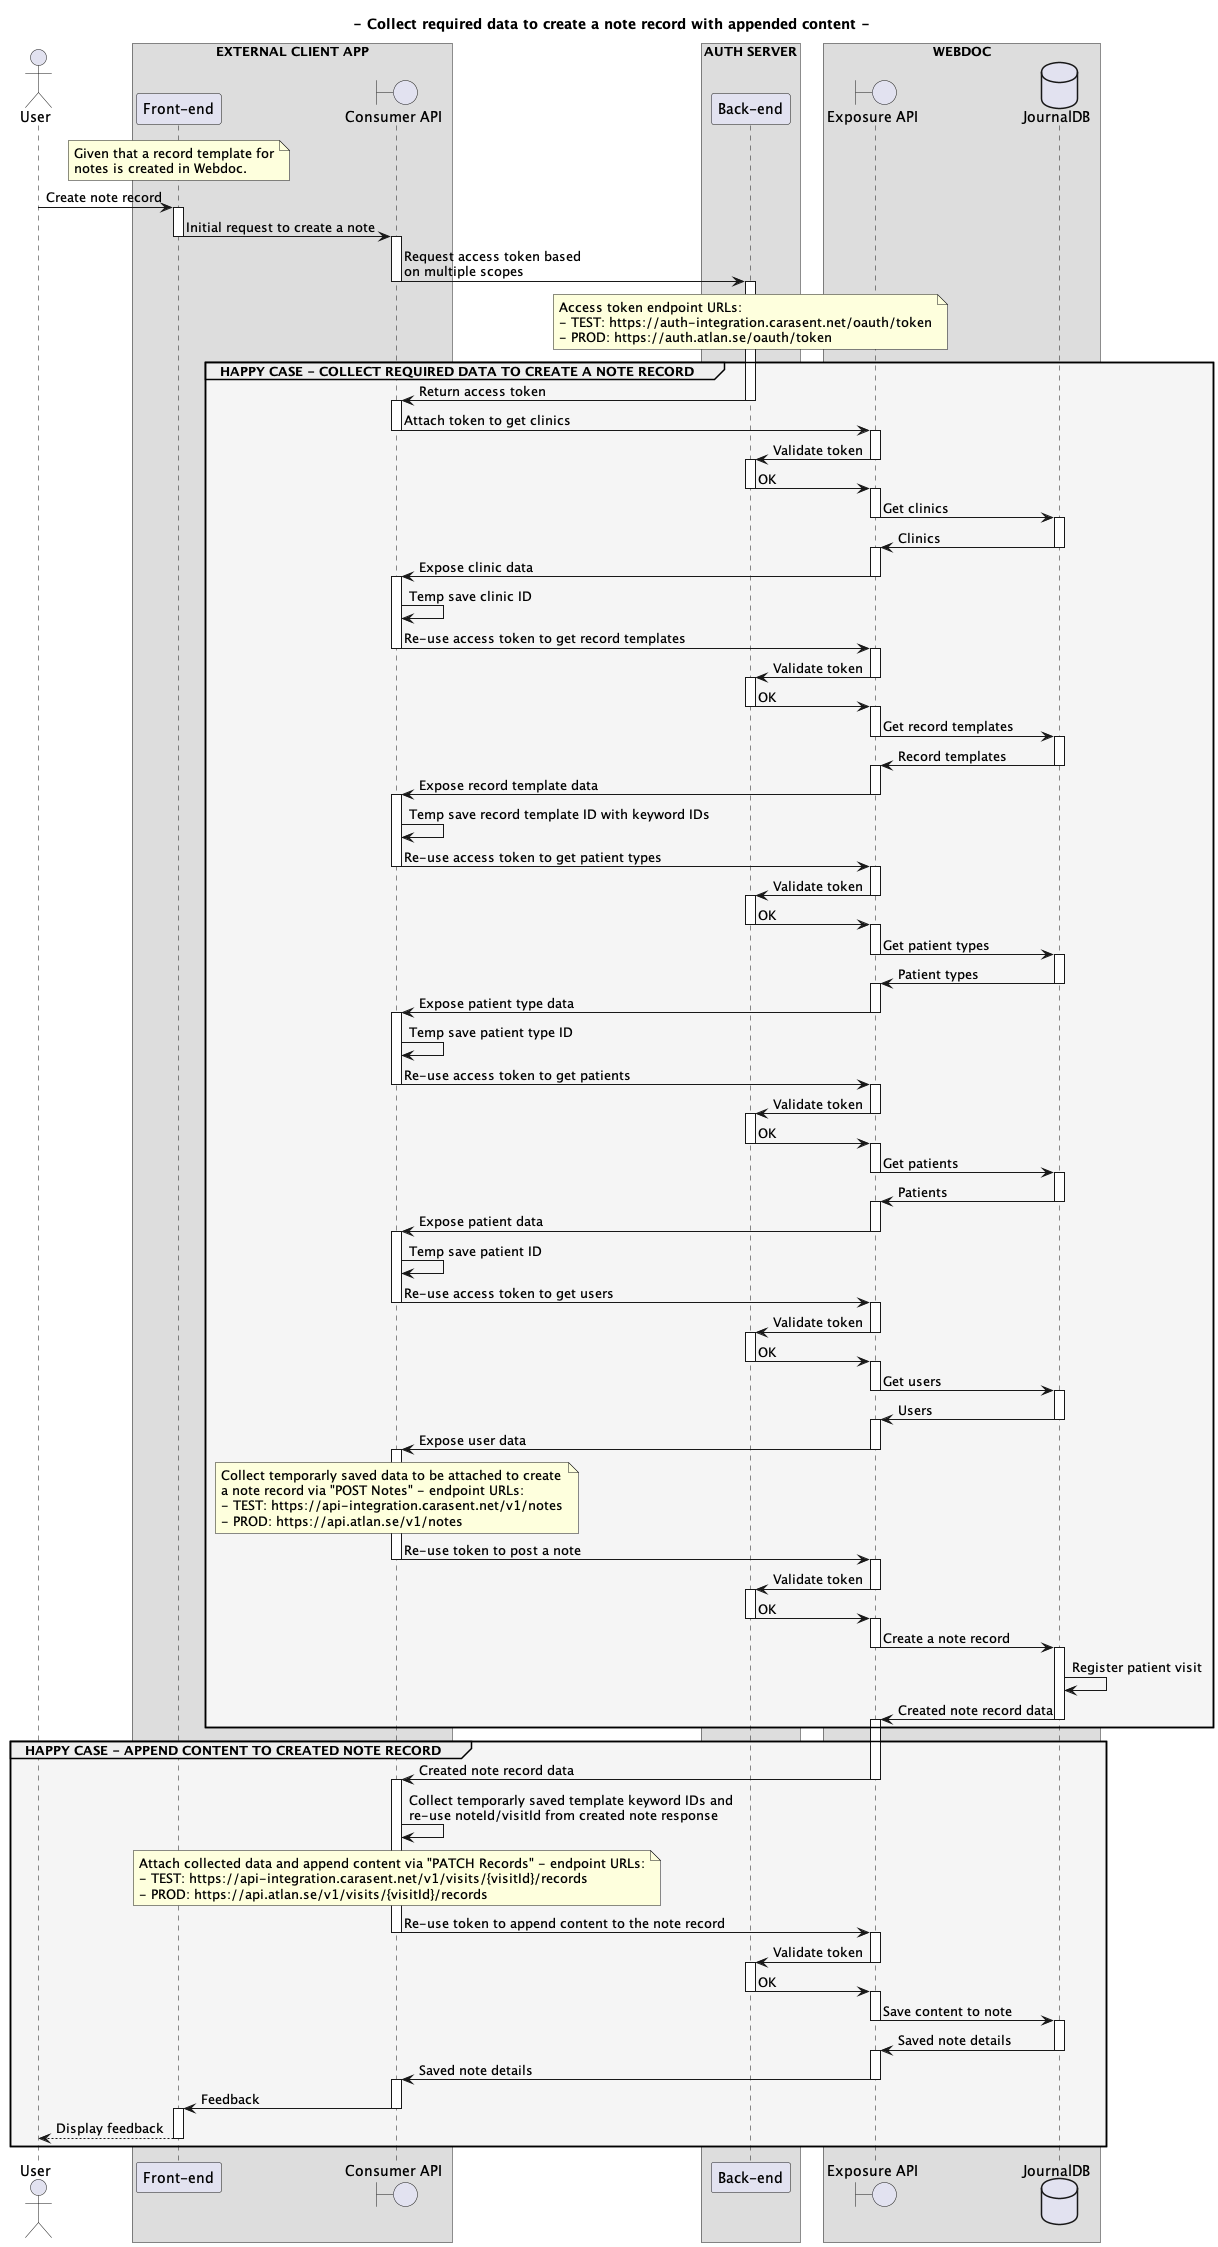
To be able to fulfill a request to externally create a note with appended content, there are a few endpoint calls with sequence flows to go through in order to get and post all necessary data.
This tutorial describes the chain of API calls necessary to fulfill the entire flow from getting the required data to be attached when creating a note, and ultimately append the note with content in the context of Webdoc (WD). Furthermore, the authorization necessary through this flow is based on the "OAuth 2.0" protocol.
All in all, the REST API endpoints included in this entire context flow are the following:
-
GET /v1/recordTemplates
(To get the required record template ID to post to the correct template type for notes.) -
GET /v2/patients
(To get the required ID for the patient to post the note for.) -
GET /v1/patientTypes
(To get the required ID for the patient type to know if the note is related to a care agreement, or an insurance company when referring to private health care.) -
GET /v1/users
(To get the required ID for the WD user to see which caregiver who posted the note.) -
GET /v1/clinics
(To get the required ID for the clinic in which the note will be saved for.) -
POST /v1/notes
(The endpoint to which all previously fetched values will be posted to, which will then create the note record registered as a patient visit in WD.) -
PATCH /v1/visits/{visitId}/records
(The endpoint to append content to the previously created note.)
Prerequisites
- API credentials must be configured in the WD auth server, such as a client ID along with a client secret and scopes, etcetera (each client ID is unique for each WD system).
- The grant_type "client_credentials" must be used in order to request a valid access token for this context.
- To fulfill the necessary API flow for the whole note context using the same access token, the token must be based on the scopes: "system-admin", "users:read", "clinics:read", "patient:write", and "patient-types:read".
-
A record template type for "notes" must exist in the WD system. This can be
created via the Webdoc GUI through the menu path:
"Admininstratör > Inställningar > Mallar > Journalformulär".
Moreover, the correct template type can then be created via option:
"Nytt formulär > Formulärtyp 'Anteckning'".
Workflow 1 - Steps to receive an access token to create a note record with appended content
-
To be able to issue an access token that can be used through the entire chain of API calls necessary to fulfill the request to create and populate a note, you can request an access token based on the following API credentials:
- Grant type: client_credentials
- Scopes: system-admin, users:read, clinics:read, patient:write, patient-types:read
Furthermore, you need a client ID and client secret, which will be provided to you by Carasent. Below is an example of how this access token can be requested through CURL having <client_id> and <client_secret> replaced with your client ID name and client secret.
Example CURL - Request an access token for this context for your TEST environment:
    curl -X \
    POST -u "<client_id>:<client_secret>" \
    -d "grant_type=client_credentials&scope=system-admin%20patient:write%20users:read%20clinics:read%20patient-types:read" \
    https://auth-integration.carasent.net/oauth/token
The requested access token will then be returned in the following JSON format.
Example JSON response - Access token with multiple scopes:
    {
        "access_token": "dbc5051a41f22a70e43432c0db329cc80fbed103",
        "expires_in": 3600,
        "token_type": "Bearer",
        "scope": "system-admin patient:write users:read clinics:read patient-types:read"
    }
Note! An issued access token is valid for one hour.
Workflow 2 - Steps to externally fetch required data to create a note record
Before you can externally append content to a note (via workflow 3), you have to create the actual record to be used for the note, which in turn needs some required data.
This section describes the endpoints to be called to collect the required data to finally be able to create a note record.
-
Collect required data to be able to create a note record
The API calls to collect the necessary data from each endpoint donnot have to be in a specific order. How the required values are collected and temporarly stored simply depends on the implementation on the integrator side. For instance, it could just be appended to and array, or stored in a session variable to later be called once the request will be done to the endpoint "POST Notes".
• Request clinic ID
Given that you have received a valid access token (via workflow 1), an example to request a required clinic ID via the endpoint "GET Clinics" can look like the below CURL request.Example CURL - Request a clinic ID for a note record:
    curl https://api-integration.carasent.net/v1/clinics \
    -H "Accept: application/json" \
    -H "Authorization: Bearer dbc5051a41f22a70e43432c0db329cc80fbed103"
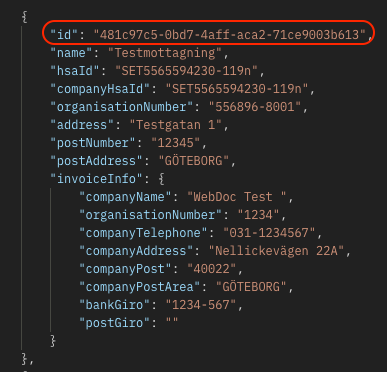
As you can see in the below example response, the clinic ID is returned in UUID format to the parameter "id". If you want the note record to be saved for the clinic named "Testmottagning", the ID to use for this would simply be "481c97c5-0bd7-4aff-aca2-71ce9003b613":
• Request record template ID
Given that you have received a valid access token (via workflow 1), an example to request the required record template ID via the endpoint "GET Record Templates" can look like the below CURL request.Example CURL - Request a record template ID for a note record:
    curl https://api-integration.carasent.net/v1/recordTemplates \
    -H "Accept: application/json" \
    -H "Authorization: Bearer dbc5051a41f22a70e43432c0db329cc80fbed103"
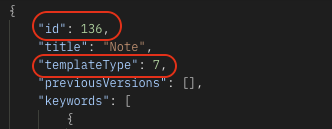
Note! A valid template for "note" shall be of templateType "7" for a record template ID.As you can see in the below example response, the note template is identified by the templateType "7". So in this example, a relevant record template ID to use would be id "136":
• Request patient type ID
Given that you have received a valid access token (via workflow 1), an example to request a required patient type ID via the endpoint "GET Patient Types" can look like the below CURL request.Example CURL - Request a patient type ID for a note record:
    curl https://api-integration.carasent.net/v1/patientTypes \
    -H "Accept: application/json" \
    -H "Authorization: Bearer dbc5051a41f22a70e43432c0db329cc80fbed103"
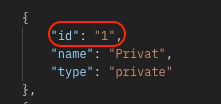
If you want the note record to relate to private health care, based on the following example response, the relevant patient type ID would then be "1":
• Request patient ID
Given that you have received a valid access token (via workflow 1), an example to request a required patient ID via the endpoint "GET Patients can look like the below CURL request.
Note! The selected patient must exist in the selected clinic.Example CURL - Request a patient ID for a note record:
    curl https://api-integration.carasent.net/v2/patients \
    -H "Accept: application/json" \
    -H "Authorization: Bearer dbc5051a41f22a70e43432c0db329cc80fbed103"
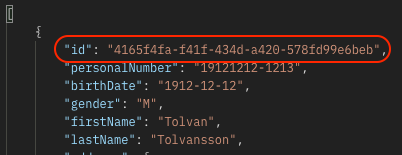
As you can see in the below example response, the patient ID is returned in UUID format to the parameter "id". If the note record shall relate to the patient identity number "19121212-1213", the ID to use for this would simply be "4165f4fa-f41f-434d-a420-578fd99e6beb":
• Request user ID
Given that you have received a valid access token (via workflow 1), an example to request a required user ID via the endpoint "GET Users" can look like the below CURL request.
Note! The selected user must exist in the selected clinic, and have permissions to post a note.Example CURL - Request a user ID for a note record:
    curl https://api-integration.carasent.net/v1/users \
    -H "Accept: application/json" \
    -H "Authorization: Bearer dbc5051a41f22a70e43432c0db329cc80fbed103"
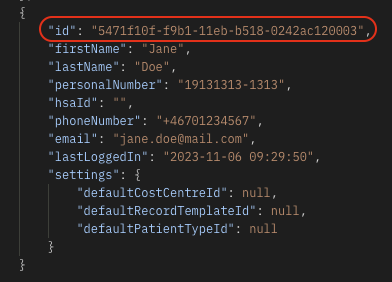
As you can see in the below example response, the user ID is returned in UUID format to the parameter "id". If the note record shall be posted by a WD user having the identity number "19131313-1313", the ID to use for this would simply be "5471f10f-f9b1-11eb-b518-0242ac120003":
Once all required data is collected through the above endpoints, it can finally be attached in a request to post a note record.
-
Create a note record based on collected data
Given that you have received a valid access token (via workflow 1) and collected the required data to be attached to create a note record, a note record can then be externally created. Moreover, the created note record will be registered as a patient visit in Webdoc.
Based on the collected data, an example request to post a new note record via the endpoint "POST Notes" can look like below.
Example CURL - Request to create a note record:
    curl --location --request POST 'https://api-integration.carasent.net/v1/notes' \
    --header 'Authorization: Bearer dbc5051a41f22a70e43432c0db329cc80fbed103' \
    --header 'Content-Type: application/json' \
    --data \
    '{
        "clinicId": "481c97c5-0bd7-4aff-aca2-71ce9003b613",
        "recordTemplateId": 136,
        "patientId": "4165f4fa-f41f-434d-a420-578fd99e6beb",
        "patientTypeId": 1,
        "userId": "5471f10f-f9b1-11eb-b518-0242ac120003"
    }'
Once the note record is created, you will get a response with the details for the created record along with the generated note ID reflecting a registered patient visit ID in WD.
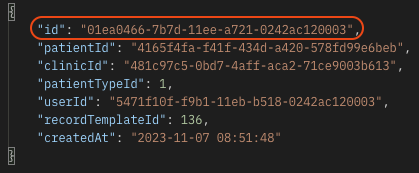
The created note ID (visit ID) can then be used in the final request to be able to append content to this note.
Workflow 3 - Steps to externally append content to a note record
The created note record can be appended with content via the endpoint "PATCH Records". To know which record to append to, the note ID (visit ID) must be attached as a path parameter in the PATCH request.
Moreover, this note ID can be re-used from the created note response (via workflow 2). If the user that created the note record will also be the author of the note content, you could simply re-use the user ID from the response as well.
-
To append content to the correct form fields for this note record, you can fetch the correct keyword IDs to use via the endpoint "GET Record Template by ID" (i.e. if these were not already collected via the request to get the record template ID via workflow 2).
Regardless if the keyword IDs were collected via workflow 2 or via a new request to get the record template by ID, the response format of the keywords section for the template would look like below:
Example JSON response - Keyword IDs for a note record template:
{ "id": 136, "title": "Note", "templateType": 7, "previousVersions": [], "keywords": [ { "id": 702, "title": "Subject", "type": 2, "maxLength": null, "defaultValue": "", "parentId": 0, "warnIfEmpty": false, "information": "", "repetitionTime": "0", "warningTime": "0", "visual": { "order": 1, "sizeX": 50, "sizeY": 0 } }, { "id": 703, "title": "Description", "type": 1, "maxLength": null, "defaultValue": "", "parentId": 0, "warnIfEmpty": false, "information": "", "repetitionTime": "0", "warningTime": "0", "visual": { "order": 3, "sizeX": 50, "sizeY": 5 } } ] } -
Assuming that you re-use the note ID and user ID returned in the
created note response, a CURL example to append content to
the note via the endpoint
"PATCH Records"
would look like below with attached keywords/form fields values.
Example CURL - Request to append content to a note record:
    curl --location \
    --request PATCH 'https://api-integration.carasent.net/v1/visits/01ea0466-7b7d-11ee-a721-0242ac120003/records' \
    --header 'Authorization: Bearer dbc5051a41f22a70e43432c0db329cc80fbed103' \
    --header 'Content-Type: application/json' \
    --data \
    '{
       "userId": "5471f10f-f9b1-11eb-b518-0242ac120003",
       "keywords": [
         {
           "id": 702,
           "value": "A subject"
         },
         {
           "id": 703,
           "value": "A note desription."
         }
       ]
    }'
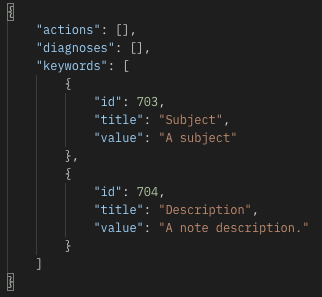
The response of the appended content to the note record can then look like below.
Example JSON response - Appended content to a note record:
 Note! Every time a template is modified via the journal settings through the Webdoc GUI, a new template version is created. This means that if the form to be used in a template has been modified, a new record template ID will be created with new keyword IDs. So in order to append content to a modified template, you have to repeat step 2 in "workflow 2" followed by step 2 in "workflow 3".
Context flow
The below sequence diagram illustrates the necessary sequence flow for this entire context (click on the image to see it in original size):