Description
The REST API endpoint "PUT Current Patient" can be used to switch a patient edit view in Webdoc (WD) from an external application. However, in order for this to work, the user has to be logged in to the same WD system in which the request is executed for.
In other words, this page describes the necessary steps for a Single Sign-On (SSO) flow - based on "OAuth 2.0" - to enable interaction with the "PUT Current Patient" endpoint in the context of Webdoc.
Prerequisites
- API credentials must be configured in the WD auth server, such as a client ID along with a client secret and scopes, etcetera (each client ID is unique for each WD system).
- A redirect URI or URL reflecting a URI/URL on the integrator side must be configured in the WD auth server.
- The scope "patient:write" must be used for the "PUT Current Patient" endpoint - both for the authorization code request and the final access token request.
- The grant_type "authorization_code" must be used in order to request a user based access token.
Workflow 1 - Steps to receive a user based access token
-
Login to your user Webdoc account via web URL:
-
TEST environment:
https://webdoc-integration.carasent.net -
PROD environment:
https://webdoc.atlan.se
-
TEST environment:
- While you are logged in to Webdoc (step 1), navigate to the following URL in a separate browser tab to request an authorization code for your environment - having <whatever> replaced with whatever state value you would like (e.g. a random string), and <client_id> replaced with the name of your client ID:
-
Let's say you have the redirect URL "https://yourdomain.com/auth" configured in the WD auth server for your client ID. Then you will receive an authorization code attached to a query parameter named "code" in that URL.
In other words, given that you are still logged in to your WD environment (step 1) and have navigated to the authorization endpoint URL (step 2), you can then expect the following example response in the browser address field:
https://yourdomain.com/auth?code=2631595b3c70a49e4d89327f08e22a50cb200da&state=<whatever>&db_name=<your-customer-db-name>Note! An authorization code is only valid for a few seconds. -
Copy the received authorization code from the response URL (step 3), in this example "2631595b3c70a49e4d89327f08e22a50cb200da", and attach it to a final request for an access token.
Example CURL - Request a user based access token:
    curl -X \
    POST -u "<client_id>:<client_secret>" \
    -d "grant_type=authorization_code&scope=patient:write&code=26315f95b3c70a49e4d89327f08e22a50cb200da" \
    https://auth-integration.carasent.net/oauth/token
You can then attach your received authorization code in a new request after an access token, which shall then be returned along with a user_id value reflecting the logged in WD user in UUID format.
Example JSON response - User based access token:
    {
        "access_token": "4b1c4d22088bd605e6b9d16cf183f49e7f7b2154",
        "expires_in": 3600,
        "token_type": "Bearer",
        "scope": "patient:write",
        "refresh_token": "a71d82d0e2c33cda993e6171e1329b52bfc9f6f4",
        "user_id": "5471f10f-f9b1-11eb-b518-0242ac120003"
    }
Note! Each issued access token is valid for one hour.
Workflow 2 - Steps to request the "PUT Current Patient" endpoint
-
Ensure you are logged in to your Webdoc environment:
-
TEST environment:
https://webdoc-integration.carasent.net -
PROD environment:
https://webdoc.atlan.se
-
TEST environment:
-
While having the Webdoc GUI open, you can then attach the user based access token (received via workflow 1) in a new request to the endpoint "PUT Current Patient" with a JSON body including the patient identity number you want to open the patient edit view for.
Endpoint URL to PUT Current Patient:-
TEST environment:
https://api-integration.carasent.net/v1/currentUser/currentPatient -
PROD environment:
https://api.atlan.se/v1/currentUser/currentPatient
Example CURL for your TEST environment:
curl --location --request PUT 'https://api-integration.carasent.net/v1/currentUser/currentPatient' \ --header 'Authorization: Bearer 4b1c4d22088bd605e6b9d16cf183f49e7f7b2154' \ --header 'Content-Type: application/json' \ --data '{"personalNumber": "19121212-1212","showWarning": true}' -
TEST environment:
- Based on the above request, you will see a dialog box open in the WD GUI asking you if you want to open the new patient. Then confirm with "Yes" to finally open the patient edit view in WD.
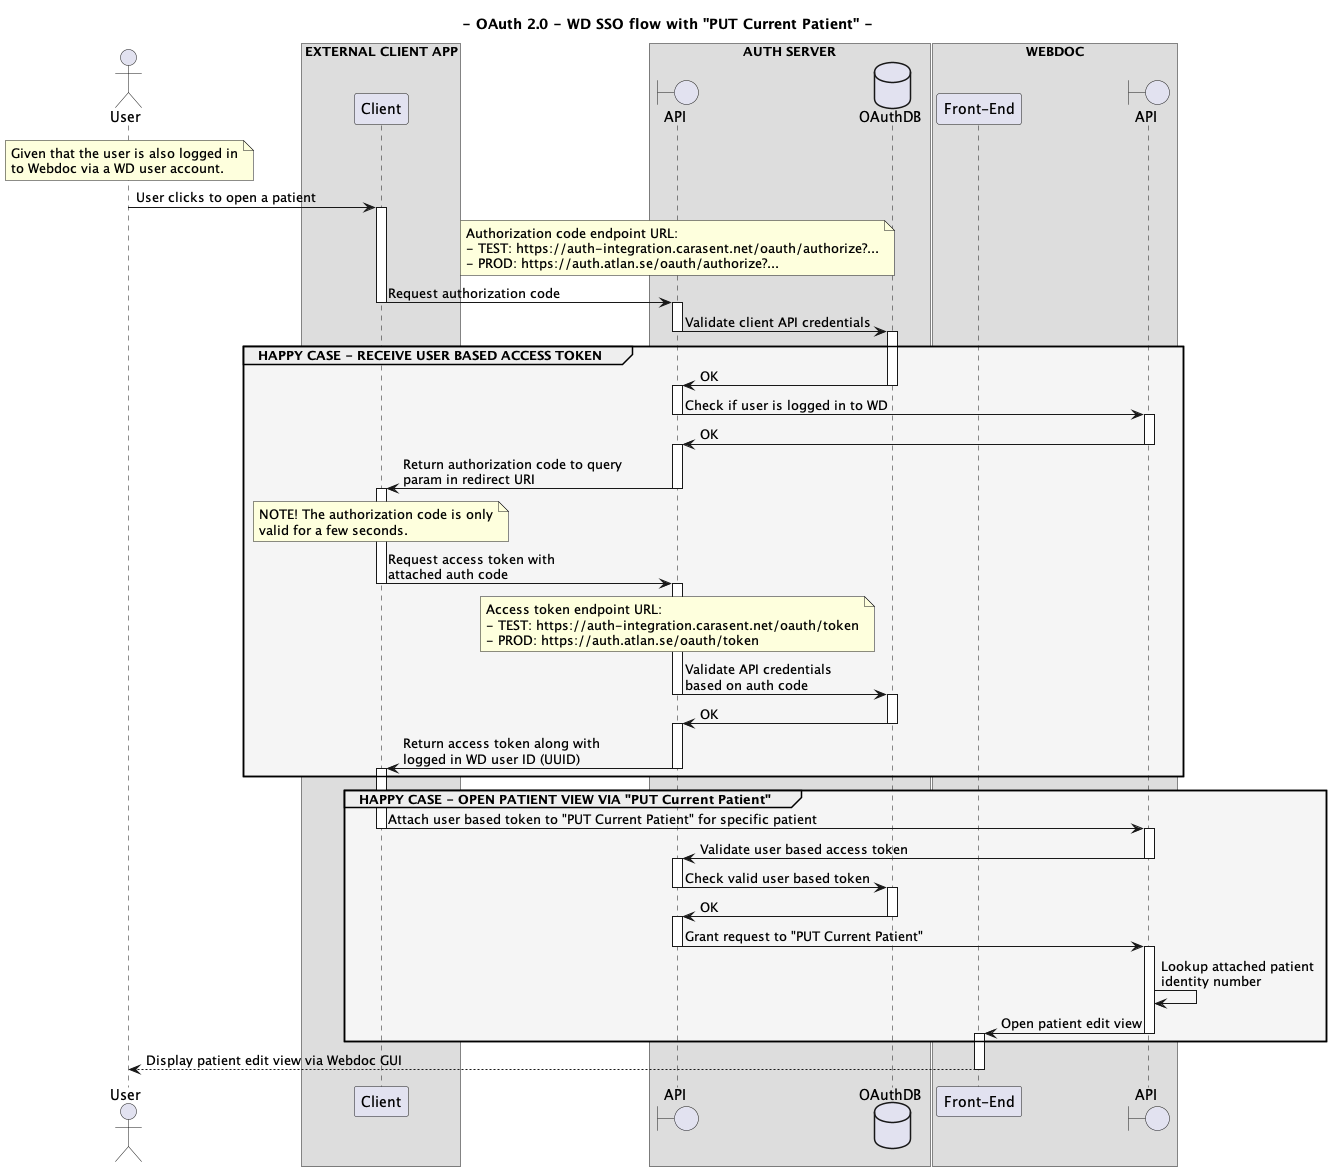
Context flow
The below sequence diagram illustrates the necessary sequence flow for this entire context (click on the image to see it in original size):